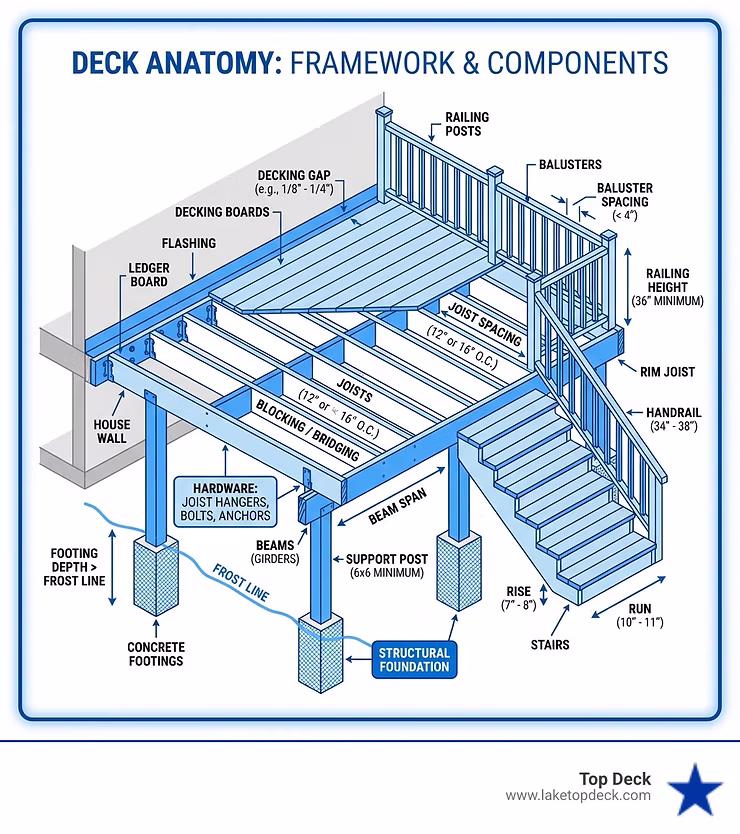
A deck framing diagram is your blueprint for building a structurally sound outdoor space—it shows exactly how footings, posts, beams, joists, and hardware connect to support the deck you’ll walk on every day. Without a clear diagram, you risk improper spacing, inadequate support, or dangerous connections that could fail over time.
What a deck framing diagram includes:
-
Footings – Concrete bases that anchor posts below the frost line
-
Support posts – Vertical columns that bear the deck’s weight (typically 6×6 minimum)
-
Beams (girders) – Horizontal supports that carry the load from joists to posts
-
Joists – The framework that runs perpendicular to the house, usually spaced 12″ or 16″ on center
-
Ledger board – Attaches the deck to your house structure (requires proper flashing)
-
Rim joists – Close off the ends of joists and create the deck’s perimeter
-
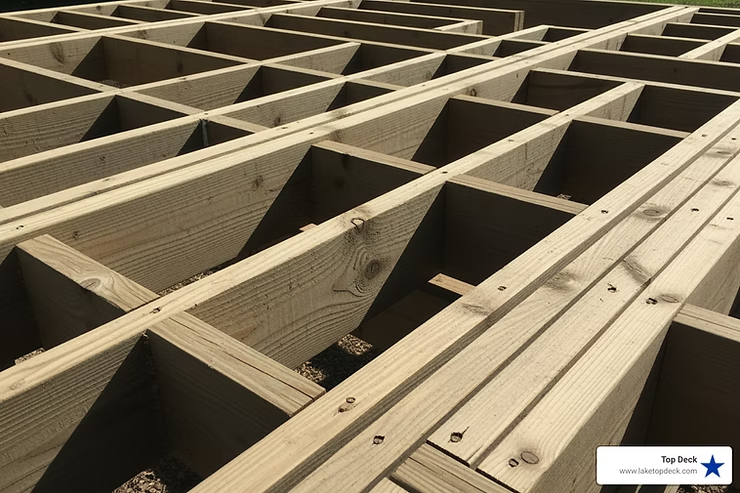
Blocking/bridging – Prevents joist twisting and adds stability
-
Hardware – Joist hangers, lag screws, bolts, and post anchors that hold everything together
Understanding these components helps you avoid common mistakes like improper ledger attachment (a leading cause of deck collapses), incorrect joist spacing, or footings that aren’t deep enough to prevent frost heave.
I’m Jason Dampier, and after years of building and repairing decks across the Midwest, I’ve seen how a proper deck framing diagram prevents costly mistakes and unsafe structures. Whether you’re tackling a DIY build or working with a contractor, knowing how to read and apply a deck framing diagram is the foundation of every successful project.
The Foundation: Understanding Your Deck’s Substructure
The true strength and longevity of any deck lie not in its beautiful surface, but in the unseen network of its substructure. This hidden framework—comprising footings, support posts, and beams—works tirelessly to bear the weight of your deck, its furnishings, and all the lively gatherings it will host.
Think of it as the skeleton of your outdoor living space, diligently distributing loads and providing unwavering stability. Without a robust substructure, even the most aesthetically pleasing deck is merely a house of cards.
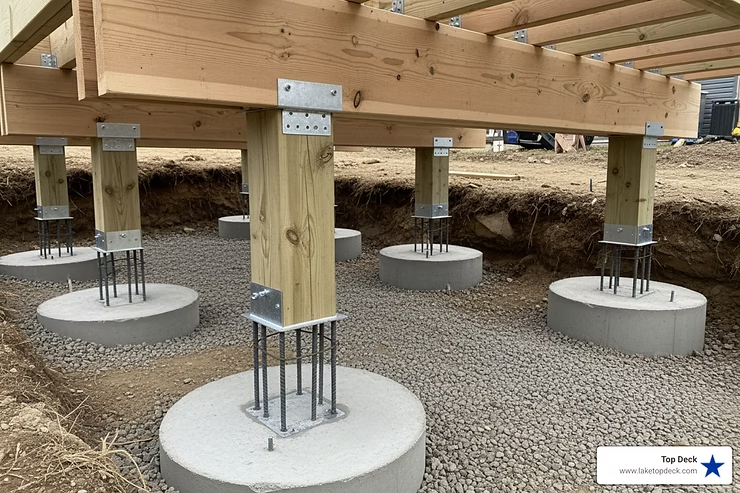
Footings, Posts, and Beams: The Trio of Support
At the very bottom of our deck framing diagram are the footings. These are the unsung heroes, providing a solid foundation by spreading the deck’s load over a greater surface area. Typically, the best type of footing is a concrete pillar poured into a hole in the ground.
In colder climates, like much of Missouri and Oklahoma, the bottom of your footings must extend below the frost line to prevent shifting and heaving as the ground freezes and thaws. It’s crucial to check with your local building department in places like Springfield, Camdenton, or Nixa to determine the exact frost line depth in your area.
Rising from these footings are the support posts. These vertical members hold up the entire deck frame and typically attach to the footings via post anchors for a secure connection. For most residential decks, a minimum 6×6 nominal post is recommended.
Taller decks or those built on a slope may require additional bracing for these posts to prevent buckling under load. Beams, also known as girders, are the horizontal members that sit atop the support posts. They bear the load transferred from the joists and distribute it evenly across the posts and down to the footings. The size and spacing of these beams are critical and are determined by the deck’s dimensions and the anticipated loads.
Sometimes, posts are notched to allow the beam to sit flush, creating a stronger connection that can be through-bolted for added security. This entire system ensures a clear load path from the deck surface all the way to the earth, relying on the soil’s bearing capacity to remain stable.
The Critical House Connection: Ledger Boards and Flashing
For decks attached to a house, the ledger board is arguably the most critical component in the deck framing diagram. This board secures the deck structure directly to your home, transferring a significant amount of the deck’s weight and live load to the adjoining building’s frame and foundation. Improper ledger board attachment is a leading cause of deck collapses, making its correct installation non-negotiable.
Attachment methods typically involve heavy-duty fasteners like lag screws or through-bolts, which must penetrate the house’s rim joist or other structural lumber. Always ensure these fasteners are compatible with treated lumber (hot-dipped galvanized or stainless steel are usually required) to prevent corrosion.
Equally important is the role of flashing. This protective barrier is installed over the ledger board and any other critical connection points to channel water away from the house and the deck’s substructure.
Without proper flashing, moisture can seep into the ledger board and the house’s rim joist, leading to rot and decay over time. We recommend applying deck joist flashing tape to the tops of joists and beams, and especially over the ledger board, to create an impenetrable seal against water, protecting your investment for years to come.
A Comprehensive Deck Framing Diagram Explained
Understanding a deck framing diagram is like learning to read a map for your construction journey. It details every structural element, from the smallest joist to the largest beam, ensuring that each piece fits perfectly and performs its function.
This blueprint isn’t just for professionals; it’s an invaluable tool for anyone looking to build a safe and sturdy deck. It guides the layout, specifies dimensions, and highlights crucial connection points, changing a complex project into a series of manageable steps.
How to Read a Deck Framing Diagram
A deck framing diagram communicates through a combination of symbols, notations, and dimensions. Here’s what to look for:
-
Dimensions: These numbers indicate the length, width, and height of components, as well as the spacing between them. For instance, “16” O.C.” means 16 inches on center, referring to the spacing of joists.
-
Joist Layout: Joists are typically represented by lines running parallel across the deck area. Their spacing is critical for supporting the decking material.
-
Beam Placement: Beams are usually thicker lines, often parallel to the house, indicating where they will support the joists.
-
Hardware Callouts: The diagram will specify where to use joist hangers, post-to-beam connectors, and various fasteners. These are vital for structural integrity. Joist hangers, for example, are essential for securely connecting joists to beams or ledger boards.
-
Fastener Schedules: These detail the type, size, and quantity of nails, screws, or bolts required for specific connections, ensuring everything is fastened correctly.
By carefully studying these elements, you can visualize the entire framework and ensure that every part of your deck is built to specification.
Key Components in a Deck Framing Diagram
Beyond the footings, posts, and beams, several other elements are crucial to a complete deck framing diagram:
-
Joists: These are the horizontal framing members that run perpendicular to the beams and ledger board. They form the skeleton upon which your decking boards will rest. The number of joists needed depends on the deck’s size and design, as well as the decking material chosen.
-
Rim Joists (Band Boards): These boards cap the ends of the joists, creating the outer perimeter of the deck frame. They tie all the joists together, providing a finished edge and additional rigidity.
-
Blocking and Bridging: These smaller pieces of lumber are installed between joists, often in a zigzag pattern, about every 4 to 6 feet. Their purpose is to prevent joists from twisting, bowing, or moving laterally, which significantly improves the deck’s stability and reduces bounce.
-
Essential Hardware for Deck Framing:
-
Joist Hangers: Metal connectors that securely attach joists to beams or ledger boards.
-
Post Anchors: Connect posts to footings, preventing uplift and lateral movement.
-
Beam-to-Post Connectors: Secure beams to posts, often used when notching is not feasible or desired.
-
Lag Screws/Through-Bolts: Heavy-duty fasteners for ledger board attachment and other critical connections.
-
Construction Screws/Nails: For general framing connections.
-
Hurricane Ties: (If required by local codes) for uplift resistance.
-
Joist Spacing and Decking Choices
The spacing of your joists is a critical decision in your deck framing diagram, directly impacting the structural integrity of your deck and the type of decking you can use.
-
For traditional wood decking (like 5/4 pressure-treated boards), joists are commonly spaced at 16 inches on center (O.C.). This spacing provides adequate support for standard wood boards.
-
For composite decking, joists often need to be spaced closer together, typically at 12 inches O.C. This is because composite materials, while incredibly durable, can sometimes have less stiffness than traditional wood, and closer joist spacing prevents flexing or “bounciness.”
-
Diagonal decking patterns also benefit from 12-inch O.C. joist spacing, as the shorter unsupported span helps maintain board stability and a sturdier feel.
Choosing the right joist spacing balances sturdiness with cost. While 12-inch O.C. spacing requires more lumber and labor, it results in a more rigid deck, especially important for composite materials or diagonal layouts. Always consult manufacturer guidelines for your chosen decking material to ensure proper support.
Materials and Finishing Touches
The choices we make for materials go beyond just the structural frame; they define the deck’s durability, maintenance, and overall aesthetic. From the lumber that forms the backbone to the surface boards, railings, and decorative elements, each decision contributes to the final look and feel of your outdoor sanctuary.
Framing Materials: Wood, Steel, and Beyond
For the core of your deck’s substructure, wood remains the most common choice in Missouri and Oklahoma.
-
Pressure-Treated Lumber: This is the workhorse of deck framing, chemically treated to resist rot, decay, and insect infestation. It’s essential for all components in contact with the ground or exposed to the elements. Always ensure that fasteners and hardware (like joist hangers) used with pressure-treated lumber are hot-dipped galvanized or stainless steel to prevent corrosion, as modern treatments can be quite corrosive to standard metals.
-
Kiln-Dried Lumber: While not always required for framing, using kiln-dried lumber, especially for visible elements or for joists that will soon be covered, offers significant benefits. Kiln-drying removes moisture from the wood, reducing its tendency to warp, twist, and shrink after installation. This leads to a more stable, flatter surface and a more professional finish. It can also be lighter to work with initially.
While wood is prevalent, other materials exist. Steel framing, for instance, offers superior strength and fire resistance. However, for most residential applications and given the focus of prescriptive guides like the AWC’s, wood framing is typically the standard.
Decking, Railings, and Stairs
Once the deck framing diagram is realized, it’s time for the layers that bring the deck to life.
-
Decking Materials: We offer a variety of options, from traditional wood (like pressure-treated pine or cedar) to advanced composite decking. Composite decking, made from recycled content, is an increasingly popular choice due to its natural-looking aesthetics, durability, and low maintenance. It resists fading, staining, scratching, and won’t rot, warp, or crack, eliminating the need for sanding, sealing, or refinishing.
-
Railing Components: Railings are crucial for both safety and aesthetics. They typically consist of railing posts (anchors for the system), railings (top and bottom rails), and balusters (vertical pickets between rails). Railings are usually required for decks with a surface higher than 30 inches off the ground, and in most areas, they must be at least 36 inches tall. The bottom rail must be low enough so that a 4-inch sphere cannot fit underneath it, ensuring child and pet safety.
-
Stairs: Deck stairs need careful design and construction. Key components include stringers (the angled supports), treads (the horizontal walking surfaces), and risers (the vertical pieces). Building codes typically dictate riser heights (e.g., 7 to 7-3/4 inches) and tread depths (e.g., 10 to 11-1/4 inches) to ensure safe and comfortable ascent and descent. Stair stringers themselves must be a minimum of 2×12 lumber and adhere to specific span limits.
Functional and Aesthetic Add-Ons
To truly lift your outdoor space, consider these functional and aesthetic improvements:
-
Fascia Boards: These boards are installed around the perimeter of the deck and stairs to conceal the exposed joists and stringers, providing a clean, finished look.
-
Skirting (Lattice): Often used beneath liftd decks, lattice provides a decorative way to hide the substructure while allowing for crucial ventilation, preventing moisture buildup, mold, and decay.
-
Under-Deck Drainage Systems: For liftd decks, these systems (like a ceiling beneath your deck) divert water away, keeping the space below dry. This allows you to use the area for storage or create a functional, sheltered outdoor living space beneath your deck.
-
Deck Lighting: Integrated deck lighting, from post cap lights to stair riser lights, improves ambiance and safety, making your deck enjoyable long after the sun sets.
-
Cladding: Applied vertically or horizontally, cladding adds a contemporary aesthetic and can also act as a rainscreen, protecting the underlying structure from the elements.
For more on available products that can complete your deck, from framing to finish, explore our Products selection.
Planning Your Project: Codes, Tools, and Resources
Starting on a deck project, whether a modest platform or an expansive multi-level design, requires careful planning. This initial phase, often overlooked in the excitement of construction, is where you lay the groundwork for success.
It involves everything from understanding local regulations to gathering the right tools and visualizing your finished space. A well-planned project minimizes headaches, prevents costly mistakes, and ensures your deck is not only beautiful but also safe and compliant.
Navigating Building Codes and Permits
Before a single board is cut or a footing is dug, understanding your local building codes is paramount. In cities like Branson, Nixa, or Marshfield, Missouri, and across Oklahoma, these codes dictate everything from footing depth and post size to railing height and ledger board attachment.
-
Permits: A building permit is required for most decks, especially those 30 inches or more above grade. Even if your deck is lower, local regulations might still apply, particularly concerning setbacks from property lines.
-
Local Building Department: Always check with your local building code department to determine specific requirements. They can provide guidance on frost line depths, snow load requirements (if applicable), and approved construction methods.
-
Prescriptive Guides: Documents like the Prescriptive Residential Wood Deck Construction Guide, based on the International Residential Code (IRC), offer detailed, code-compliant methods for deck construction. Following such a guide can simplify the permit process and ensure your deck framing diagram meets all necessary safety standards.
-
Inspections: Be prepared for multiple inspections throughout the construction process—from footings to framing to the final structure—to ensure compliance.
Neglecting local codes can lead to expensive rework, fines, or even the forced demolition of your deck. It’s always better to be safe than sorry!
Essential Tools and Design Resources
Having the right tools makes all the difference in a deck framing project. Here’s a list of essentials we recommend:
-
Cutting Tools: Circular saw, miter saw (for precision cuts), jigsaw (for intricate cuts).
-
Measuring & Marking Tools: Tape measure, level (long and short), carpenter’s pencil, chalk line, speed square, framing square.
-
Fastening Tools: Hammer, drill/driver, impact driver, hammer drill (for concrete), Ram set (for ledger to concrete).
-
Digging Tools: Shovel, post-hole digger.
-
Safety Gear: Safety glasses, gloves, hearing protection.
Beyond physical tools, modern deck design software and visualization tools can be incredibly helpful. Many manufacturers offer online deck designers that allow you to plan your deck, choose materials, and even visualize it in 3D.
These resources, coupled with professional consultation, can turn your dream deck into a tangible deck framing diagram and then into reality. For expert guidance and support every step of the way, explore our Services.
Frequently Asked Questions about Deck Framing
What is the most common mistake in deck framing?
The most common and potentially dangerous mistake in deck framing is improper ledger board attachment. As we mentioned, the ledger board transfers a significant portion of the deck’s load to the house, and if it’s not securely fastened to structural elements with appropriate fasteners and flashing, it can lead to catastrophic failure.
Other frequent errors include inadequate flashing (leading to rot and water damage), incorrect footing depth (resulting in frost heave and structural instability), and insufficient or incompatible hardware, which compromises the entire frame’s integrity.
Can I build a deck without attaching it to my house?
Absolutely! This is known as a freestanding or floating deck. A freestanding deck is an excellent option when direct attachment to the house is impractical or prohibited (e.g., if your house has brick veneer, a weak rim joist, or a cantilevered floor overhang).
Instead of relying on a ledger board, a freestanding deck has its own independent support system of additional footings, posts, and beams. It requires careful design to ensure proper lateral bracing to resist horizontal movement and wind loads, but it offers flexibility in placement and often simplifies the permit process in certain situations.
How far can a 2×10 deck joist span?
The span capability of a 2×10 deck joist depends on several factors: the species and grade of lumber, the joist spacing, and the live and dead loads it’s designed to support. For example, a 2×10 Southern Pine joist spaced at 16 inches on center can typically span up to 14 feet, 0 inches, under standard residential deck loads (40 psf live load, 10 psf dead load).
If you reduce the spacing to 12 inches on center, the span can increase slightly, or the joist will simply feel sturdier. Conversely, using a lower-grade lumber or wider spacing will reduce the allowable span. Always consult current span tables from prescriptive guides like the AWC’s or your local building codes to ensure your joist spans are compliant and safe.
Build with Confidence from the Frame Up
We’ve covered a lot of ground, delving into the intricate world of the deck framing diagram. From the foundational footings and robust beams to the essential joists, blocking, and critical ledger board connection, every component plays a vital role in creating a safe and enduring outdoor space. Understanding these elements, coupled with a keen eye on local building codes and the right materials, is your recipe for success.
Building a safe, durable deck starts with a solid plan and the right materials. By understanding every component in a deck framing diagram, you can ensure your outdoor living space is built to last. For premium materials and expert guidance on your next project, explore our Framing solutions.