Deck code requirements ensure your outdoor living space is safe, structurally sound, and legally compliant. Here’s what you need to know:
Essential Deck Code Requirements:
-
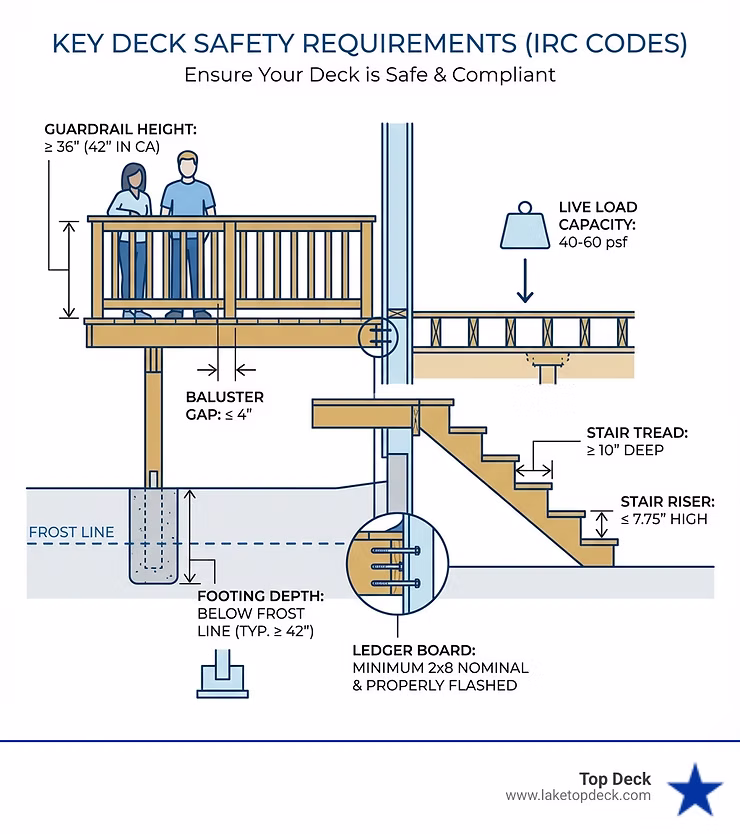
Guardrails are required when the deck is 30″ or more above grade
-
Guardrail height must be at least 36″ (42″ in California)
-
Baluster spacing cannot exceed 4″ between posts or rails
-
Footings must extend below the frost line (typically 42″ deep in many areas)
-
Ledger boards must be minimum 2×8 nominal and properly flashed
-
Stair treads must be at least 10″ deep with risers no higher than 7.75″
-
Handrails are required on stairs with 4 or more risers (34″-38″ height)
-
Load capacity must support at least 40 psf live load (60 psf in some states)
Building a deck isn’t just about creating outdoor space—it’s about doing it safely and legally. Deck code requirements exist for a reason. They protect you, your family, and anyone who sets foot on your deck. They also protect your wallet. Insurance claims can be denied if your deck doesn’t meet code, and when it’s time to sell, unpermitted or non-compliant decks become serious liabilities that can kill deals or slash your home’s value.
The foundation of most deck codes comes from the International Residential Code (IRC), but states and local jurisdictions often add their own amendments. What passes inspection in one county might fail in another. Frost line depths vary. Load requirements differ. Some areas have specific rules about proximity to saltwater or seismic activity.
Why codes matter beyond just passing inspection: A properly built deck resists rot, prevents structural failure, and stands up to decades of weather and use. Cutting corners or ignoring requirements doesn’t just risk a failed inspection—it risks real injury and costly repairs down the road.
I’m Jason Dampier, and I’ve spent years building decks across the Missouri and Ozarks region, working directly with inspectors and navigating local deck code requirements to ensure every project meets or exceeds standards. At TopDeck, we’ve replaced dozens of failing decks that were built without proper permits or ignored critical code requirements, and those experiences taught me exactly what goes wrong when builders skip the fundamentals.
The Foundation: Footings, Posts, and Load Capacity
Every great deck starts with a solid foundation. Just like a house, a deck needs to be anchored firmly to the ground to support the weight of people, furniture, and even heavy snow or wind. This is where load requirements, footings, and posts come into play.
Our decks must support a minimum live load of 40 pounds per square foot (psf). Live load accounts for the weight of people and movable objects. Beyond that, we also consider dead load – the permanent weight of the deck itself, plus any fixed elements like heavy planters or built-in benches. In some regions, or for specific deck designs, this live load requirement can increase to 60 psf, so always check with your local jurisdiction.
If you want to dig deeper into how residential structural loads are defined, the International Residential Code provides the model standards many local building departments adopt and modify.
General deck code requirements for footings and posts
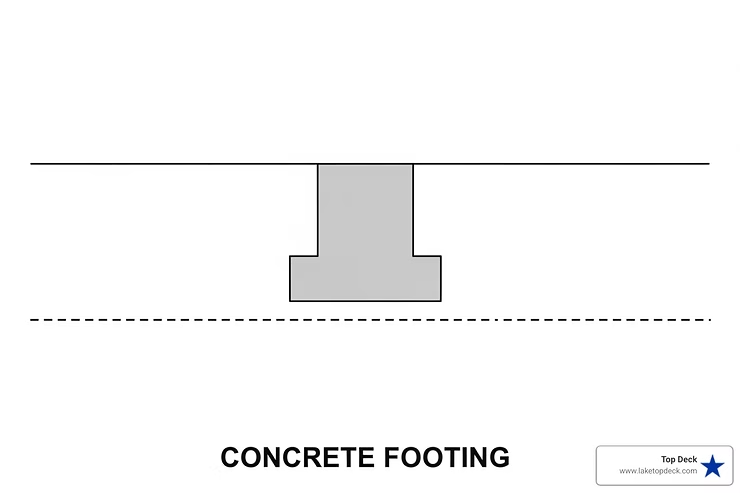
Footings are the concrete bases that transfer the deck’s weight to the soil. The most critical aspect of footings is their depth. They must extend below the frost line – the depth to which the ground freezes in winter. If footings aren’t deep enough, the freezing and thawing of the soil (known as frost heave) can lift, shift, and damage your deck’s structure.
While Illinois typically specifies a 42-inch depth, frost lines vary significantly even within Missouri and Oklahoma. For instance, northern Missouri might have a deeper frost line than southern Oklahoma. Always consult your local building department in places like Camdenton, Springfield, Lake of the Ozarks, Branson, or Nixa for the exact frost line depth in your area.
Footings must bear on undisturbed soil, meaning soil that hasn’t been previously excavated and refilled, as disturbed soil can settle unevenly. We typically use concrete piers, ensuring they are properly sized to handle the calculated loads. The size of the footing will depend on the deck’s total load, the soil bearing capacity, and the size of the posts it supports.
Posts are the vertical supports connecting the deck frame to the footings. For decks that stand over 4 feet high, posts should be at least 6×6 inches (nominal) to provide adequate lateral stability and strength. While 4×4, 4×6, or 8×8 posts might be permitted in certain situations, 6×6 is our go-to for robust support. Posts also have height limitations: a 4×4 post typically shouldn’t exceed 10 feet in height, while a 6×6 post can go up to 18 feet. These limits ensure the posts can withstand buckling and lateral pressures.
Using kiln-dried posts and framing members wherever possible can further improve performance at the foundation level. Kiln-dried lumber has lower moisture content, so it is less likely to twist or warp as it acclimates, helping keep connections between posts, beams, and joists tight and code-compliant over time.
Connecting the posts to the footings is crucial. We use manufactured connectors or ensure a minimum post embedment of 12 inches into concrete piers for lateral restraint. For freestanding decks, where the deck isn’t attached to the house, footings must often be at the same elevation as the adjacent house footing if they are within 5 feet of the dwelling’s foundation. This prevents differential settlement between the deck and the house.
For more information on the structural integrity of your deck’s foundation, you can explore our Framing resources.
The Framework: Joists, Beams, and Ledger Boards
Once the foundation is set, we move on to the framework—the skeleton of your deck. This includes the joists, beams, and the critical ledger board that often connects the deck to your house.
Framing best practices dictate that joists, which are the horizontal members supporting the decking, are typically spaced 16 inches on center (OC) for 2×8 or larger lumber. This spacing can vary to 12 inches OC for added stiffness or to accommodate specific decking materials like some composite options. The size of the lumber directly impacts its span capabilities.
For example, a 2×8 joist generally shouldn’t exceed a 12-foot span, while a 2×10 joist can span up to 15 feet when spaced 16 inches apart. Always refer to span tables provided by your local building authority or the IRC for precise measurements based on lumber species and grade.
When selecting lumber, we recommend using high-quality materials, and for wood framing, kiln-dried lumber offers significant benefits. Kiln-dried lumber has a lower moisture content, which means it’s less prone to warping, twisting, and shrinking as it dries. This leads to a more stable and aesthetically pleasing deck frame, better fastener retention, and overall increased longevity of your deck.
Beams, which support the joists, also have specific span limitations. We ensure that joist and beam cantilevers—the portions that extend unsupported beyond a post or beam—do not exceed one-quarter (1/4) the length of the joist or beam’s main span.
This prevents excessive deflection and ensures structural integrity. Blocking, or short pieces of lumber installed between joists, is essential for lateral stability and should be installed in rows every 4 to 6 feet, especially where joists are longer.
For decking materials, whether you choose traditional wood or modern Composite Decking, manufacturer specifications are paramount. While wood decking typically uses 5/4 or 2×6 boards, composite decking often has different span requirements and must be installed according to the manufacturer’s guidelines to maintain warranty and code compliance.
All decking material should be composed of dimension lumber (2″ nominal thickness) or span-rated decking, attached to each joist with at least two 8d threaded nails or two # 8 screws.
Attaching a Deck: Ledger Board Rules
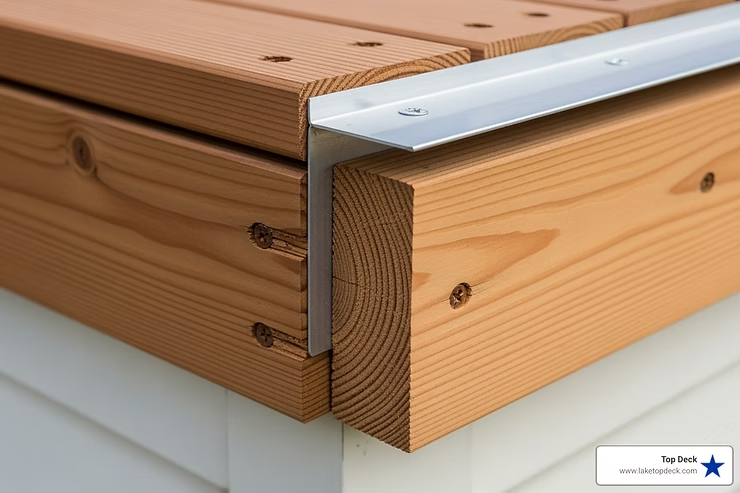
The ledger board is a critical component for any deck attached to a house. It’s essentially a board that attaches directly to your home’s rim joist or band board and supports one end of your deck joists. Improperly attached ledger boards are one of the leading causes of deck failure, which is why deck code requirements around them are so strict.
A ledger board must be a minimum nominal 2×8 and equal to or greater than the depth of your deck joists. Before installation, we always remove any exterior finishes like siding to ensure a direct connection to the house’s structural framing. Crucially, ledger boards should never be attached to exterior veneers such as brick, stone, or hollow masonry, nor to cantilevered floor overhangs. If your house has these features, a freestanding deck is the safer and code-compliant option.
Flashing is non-negotiable for ledger boards. We install corrosion-resistant flashing along the entire length of the ledger board, behind it and extending over the top edge, to prevent water from penetrating the house’s structure. This protects against rot and water damage to both your home and your deck.
When it comes to fasteners, we use nothing less than 1/2-inch diameter lag screws or bolts with washers. Nails are absolutely prohibited for ledger board attachment because they lack the necessary withdrawal resistance to support the deck’s weight and resist lateral forces.
Fasteners are installed in two staggered rows, with a 2-5 inch gap between rows and at least 2 inches between the fastener and the ledger’s edge. The spacing of these fasteners is critical and depends on the joist span, so we always consult the relevant code tables for precise measurements.
Beyond vertical support, the ledger board must also resist significant horizontal (lateral) loads. To achieve this, we install hold-down tension devices with a minimum load capacity of 1,500 pounds. These devices are typically placed within two feet of the deck’s edges and are designed to prevent the deck from pulling away from the house, especially during high winds or seismic activity.
For more detailed information on selecting and installing the right materials for your deck’s framework, check out our resources on Decking and Framing.
Understanding Key Deck Code Requirements by Component
Beyond the foundation and framework, specific components like railings and stairs have their own detailed deck code requirements to ensure safety and prevent accidents.
Railing requirements, also known as guardrails, are paramount for any liftd deck. The general rule is that guardrails are required once any part of the deck surface is 30 inches or more above grade. This 30-inch threshold is a common standard across many jurisdictions, including those in Missouri and Oklahoma.
Once a guardrail is required, its height is critical. The top of the rail must be at least 36 inches measured vertically from the deck surface. While California is an exception, requiring 42-inch guards, the 36-inch height is standard for residential decks in our region.
These guardrails must also be robust, designed to withstand a concentrated load of 200 pounds of pressure, and a 50 lbf vertical and horizontal load along the top rail. This ensures they won’t fail if someone leans against them or falls into them.
Perhaps one of the most well-known deck code requirements is for baluster spacing. Balusters, or spindles, are the vertical elements between the top and bottom rails. The rule is simple: a 4-inch sphere (like a child’s head) must not be able to pass through any gap in the guardrail, including between balusters and between the deck surface and the bottom rail. This prevents small children from slipping through and falling.
To ensure precise compliance, it’s important to accurately calculate the number and spacing of balusters needed for your deck. For more insights into railing styles and options that meet these stringent requirements, visit our Railing page.
Building Safe and Compliant Deck Stairs
Deck stairs are often a focal point and a high-traffic area, making their design and construction critical for safety. Deck code requirements for stairs are very specific to prevent tripping hazards and ensure easy, comfortable use.
Stair stringers, the saw-toothed supports that hold the treads, are typically constructed from nominal 2×12 lumber. For cut stringers, the maximum span is generally 6 feet, while solid stringers can span much further, up to 13 feet 3 inches.
Sawn stringers should be spaced 18 inches on center and have a minimum 5-inch throat dimension. We attach stringers using joist hangers specifically designed for stairs, with a minimum capacity of 625 pounds, and ensure they bear on proper footings at grade.
Tread depth and riser height are perhaps the most crucial dimensions for stair safety. Each stair tread must be at least 10 inches deep. If the tread depth is less than 11 inches, a nosing (the projection of the tread beyond the riser) of 3/4 to 1 1/4 inches is usually required.
Stair risers, the vertical part of each step, should not exceed 7.75 inches in height. Consistency is key: the variations between riser heights or tread depths within a single flight of stairs cannot exceed 3/8 of an inch. Even a slight inconsistency can create a serious tripping hazard.
Handrails are required on stairs with four or more risers (some codes specify three, but four is a common threshold). The handrail height, measured vertically from the nose of the stair tread, must be between 34 and 38 inches. Handrails should also be graspable, meaning they can be easily gripped by hand. Finally, all stairs must have a minimum width of 36 inches to allow for comfortable and safe passage.
Building compliant stairs ensures easy access and provides an important safety feature for all users. For more on making your outdoor spaces accessible and enjoyable, explore our Accessibility resources.
The Red Tape: Permits, Inspections, and Special Cases
Navigating the administrative side of deck building—permits and inspections—is just as important as the construction itself. Skipping these steps can lead to costly fines, mandatory demolition, and headaches down the road.
Permit requirements vary by jurisdiction, but generally, if you’re building a new deck, enlarging an existing one, or even replacing a significant portion of your deck’s structure, a building permit will be required. In many areas, including those across Missouri and Oklahoma, a permit is required for deck construction regardless of the deck’s size or height, especially if it’s attached to the house or over a certain elevation.
For example, if your deck is more than 30 inches above adjacent grade, attached to a structure with frost footings, or part of an accessible route, a permit is almost certainly needed. If you proceed without one, you could face fines and be forced to tear down your beautiful new deck.
When applying for a permit, you’ll typically need to submit detailed plans. This includes a layout of your proposed deck, specifying dimensions, material types, fastener types, and, crucially, how the ledger board will be attached to your house. These plans ensure that your design meets all local deck code requirements before construction even begins.
Once you have your permit, inspections are a necessary part of the process. A deck inspector will typically look at several stages of construction to ensure compliance:
-
Footing Inspection: This happens before concrete is poured. The inspector verifies that your post holes are dug to the correct depth (below the frost line), are properly sized, and bear on undisturbed soil.
-
Framing Inspection: Once the posts, beams, joists, and ledger board are in place but before decking is installed, an inspector will check the structural integrity. They’ll look at joist and beam spans, fastener types and spacing, ledger board attachment, and overall framing consistency. Common reasons for failure at this stage include improper fasteners (like using nails for a ledger board), incorrect joist spacing, or inadequate lateral bracing.
-
Final Inspection: After the deck is completely built, including decking, railings, and stairs, the final inspection ensures everything is finished according to code. They’ll check railing height and baluster spacing, stair dimensions, and overall safety features. Common reasons for failure here include baluster gaps that are too wide, inconsistent stair risers, or railings that don’t meet height or load requirements.
We always advise our clients that a deck should not be used or occupied until final inspection and approval are obtained. This isn’t just a formality; it’s a safety measure.
Navigating local deck code requirements and permits
The importance of local codes cannot be overstated. While the International Residential Code (IRC) provides a baseline, local authorities in places like Camdenton, Lake Ozark, Springfield, and Branson often adopt the IRC with specific amendments to suit their unique climate, soil conditions, and community needs. For instance, frost depth requirements will vary, as will specific load capacities for snow in areas that receive heavy snowfall.
This is why we always emphasize the need to consult your local building authority directly. They are the definitive source for deck code requirements in your specific area. They can provide information on permit applications, required inspection stages, and any unique local regulations that might apply to your project. Don’t rely solely on general guides; your local building authority has the final say. You can often find contact information for your local building authority through your city or county website.
What about special cases, like adding a hot tub or heavy outdoor kitchen? These elements introduce significant concentrated loads that can drastically alter the structural requirements of your deck. If you plan to include a hot tub, spa, or other heavy features, your deck’s design will likely need to be reviewed or even engineered by a licensed architect or engineer.
Standard prescriptive deck codes typically do not cover these heavy loads, and additional footings, larger beams, and stronger connections will be necessary to safely support the extra weight. This is a crucial step to prevent catastrophic failure and ensure the safety of your investment.
Frequently Asked Questions about Deck Codes
We often hear similar questions from homeowners and DIYers tackling deck projects. Here are some of the most common ones we address regarding deck code requirements:
Do I need a permit for a small or low-to-the-ground deck?
In many areas, including much of Missouri and Oklahoma, a building permit is required for deck construction regardless of the deck’s size or height, especially if it is attached to the house. Even if it’s a low-to-the-ground deck, if it’s attached to the house, it likely requires a permit because it impacts the house’s structure and drainage.
Some freestanding decks that are very low to the ground (e.g., less than 20 inches above grade and under 200 sq ft) might be exempt, but it’s always best to check with your local building department (in places like Springfield, Lake Ozark, or Nixa) before assuming an exemption. Ignoring this can lead to fines and having to tear down your deck.
What is the most common reason a deck fails inspection?
From our experience, and based on common inspection failures, improperly attached ledger boards are a leading culprit. This often includes using the wrong fasteners (like nails instead of lag screws or bolts), incorrect spacing of fasteners, or failing to remove siding and install proper flashing.
Other frequent reasons for inspection failure include incorrect joist spacing, missing or inadequate guardrail elements (wrong height, baluster gaps too wide), and inconsistent stair tread depths or riser heights. Essentially, any structural connection or safety feature that doesn’t meet the precise code specifications can lead to a failed inspection.
Can I use nails to attach a ledger board?
Absolutely not. This is a critical mistake and a primary cause of deck failures. Ledger boards should always be attached to the house’s band board or rim joist using heavy-duty lag screws or bolts, not nails.
Nails do not have the shear strength or withdrawal resistance required to safely support a deck and resist lateral loads. Using nails for a ledger board will almost certainly result in a failed inspection and create a dangerous situation. We always use 1/2-inch diameter lag screws or bolts with washers, installed in staggered patterns, to ensure a secure and code-compliant connection.
Conclusion: Build with Confidence and Quality Materials
Navigating deck code requirements might seem daunting, but it’s a vital step in creating a safe, durable, and enjoyable outdoor living space. From ensuring your footings are below the frost line to carefully spacing your balusters and properly attaching your ledger board, every detail contributes to the overall integrity and longevity of your deck.
At TopDeck, we understand the complexities of these codes and the importance of adhering to them. We pride ourselves on supplying premium decking, railing, and Framing materials, and offering expert guidance to contractors, homeowners, and DIYers across the Lake of the Ozarks, Springfield, and broader Missouri and Oklahoma regions. Our comprehensive support ensures that from the frame to the finish, your deck project meets every standard, providing you with peace of mind and a beautiful outdoor area to enjoy for years to come.
Don’t let code requirements intimidate you; let them guide you to a superior build. We’re here to help you build with confidence and quality.