How to bolt metal railing to deck starts with one critical fact: your railing is only as strong as its connection to the deck frame. Metal railings offer durability and style, but they must be securely attached with through-bolts, structural blocking, and proper hardware to meet building codes and ensure safety.
Quick Answer: How to Bolt Metal Railing to Deck in 7 Steps
-
Install blocking – Add 2×8 kiln-dried blocking between joists where posts will attach
-
Mark post locations – Space posts 6-8 feet apart, mark holes on post and blocking
-
Drill pilot holes – Use 5/8″ bit through post, blocking, and rim joist
-
Insert through-bolts – Use 1/2″ x 6-8″ hot-dipped galvanized bolts with washers
-
Check for plumb – Level posts in both directions before tightening
-
Tighten hardware – Secure nuts firmly without crushing wood fibers
-
Attach rails and balusters – Follow manufacturer’s bracket system
The research is clear: most railing failures happen at the post attachment. As one experienced builder noted, “when I repair or rebuild a deck, the railing posts are by far the most common place where previous builders have done things improperly, creating a serious safety hazard.”
Correctly installed metal railings last 20+ years, but cutting corners on bolting compromises safety and your investment. Improperly bolted posts act as levers, multiplying outward force and risking catastrophic failure.
I’m Jason Dampier of TopDeck. I’ve seen how proper railing installation ensures a deck lasts for decades. Learning how to bolt metal railing to deck framing correctly is essential for any deck project, new or old.
This guide covers everything from selecting hardware to the exact techniques for a code-compliant, durable railing.
Planning Your Metal Railing Installation
Before drilling, a solid plan is essential for safety and code compliance. We want your deck in the Lake of the Ozarks or Springfield, MO, to be a place of relaxation, not worry.
Choosing the Right Metal for Your Deck
The choice of metal railing comes down to budget, style, and desired maintenance.
-
Powder-Coated Aluminum Railings: This is the most popular choice for modern decks.
-
Pros: Lightweight, durable, and naturally rust-proof, aluminum is a top choice. The powder-coating adds protection and color variety for a contemporary look. It’s the most maintenance-free option, lasting 20+ years.
-
Cons: Can get hot in direct sunlight, though it dissipates heat faster than other materials.
-
-
Stainless Steel Railings: A fantastic choice for a sleek, modern, and industrial aesthetic.
-
Pros: Known for its silvery luster and corrosion resistance, especially in cable systems. It’s strong, durable, and low-maintenance.
-
Cons: Can be more expensive than aluminum and also gets hot in direct sunlight.
-
-
Wrought Iron Railings: Delivers a classic, ornate, or traditional look.
-
Pros: Extremely sturdy with a timeless, decorative appeal. It’s paintable for customization.
-
Cons: Prone to rust without regular painting and sealing. It’s heavy and usually requires professional installation.
-
At Top Deck, we offer premium metal railing systems for any outdoor living space. You can explore our various More info about Railing options and find the perfect fit.
|
Metal Railing Type |
Durability |
Cost (per linear foot) |
Maintenance |
Style |
|
Powder-Coated Aluminum |
Excellent (20+ years) |
$40 – $55 |
Very Low |
Modern, Contemporary, Versatile |
|
Stainless Steel |
Excellent |
Higher |
Low |
Modern, Industrial, Sleek |
|
Wrought Iron |
High |
Moderate to High |
Moderate (requires painting) |
Classic, Traditional, Ornate |
Understanding Building Codes and Requirements
Checking local building codes in Missouri or Oklahoma is non-negotiable. Codes are legal safety requirements. While specifics vary by city (e.g., Springfield, Nixa, Branson), general guidelines apply:
-
Railing Height: Most codes require a 36- or 42-inch tall railing. We recommend 42 inches for improved safety.
-
Post Spacing: Posts are generally spaced 6 to 8 feet apart, depending on the system and local codes. Some codes may specify a 6-foot maximum. Trex Signature posts, for example, can be installed with a 6’ or 8’ clear span.
-
Baluster Spacing: A crucial safety rule: the space between balusters (and between the bottom rail and decking) must be less than 4 inches. A 4-inch sphere should not fit through the gap.
-
Attachment Methods: Codes specify fastening requirements, like bolt diameter and connectors. This is where how to bolt metal railing to deck correctly is paramount. Posts must be securely through-bolted to structural blocking in the deck frame.
Always confirm exact requirements with your local building department in Southwest Missouri or Oklahoma. Exceeding code is a wise investment in safety.
Essential Tools and Materials for the Job
The right tools and materials ensure a smooth installation. While many kits are DIY-friendly, a helper makes the job much easier.
Here’s what we recommend:
-
Tools:
-
Drill and Impact Driver: For drilling pilot holes and driving screws.
-
Level (4-foot and torpedo): For ensuring posts are plumb and rails are straight.
-
Tape Measure and Pencil: For accurate marking.
-
Miter Saw with Metal-Cutting Blade: For precisely cutting metal railing components.
-
Wrenches/Socket Set: For tightening bolts and nuts.
-
Clamps: For holding posts and blocking in place during fastening.
-
Rubber Mallet: For tapping components into place.
-
Safety Gear: Safety glasses, gloves, and ear protection.
-
-
Materials:
-
Metal Railing Kit: Your chosen system with all included components.
-
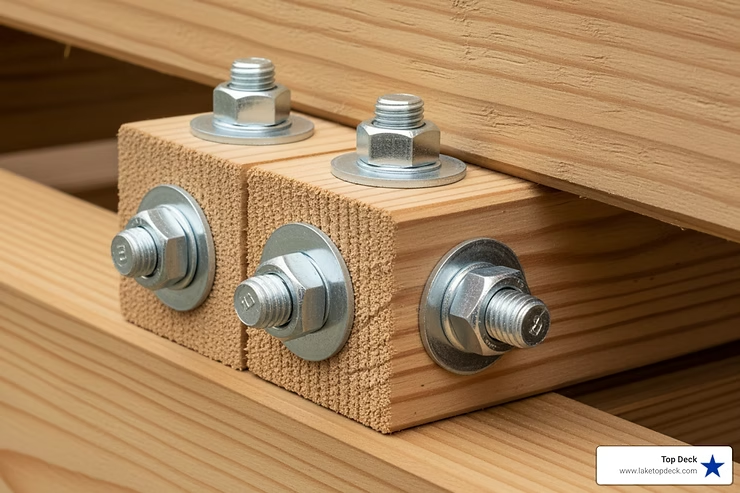
Through-Bolts: 1/2-inch diameter, hot-dipped galvanized or stainless steel, 6-8 inches long.
-
Washers: Large, broad-bearing washers.
-
Nuts: Corresponding nuts for bolts.
-
Kiln-Dried Structural Blocking: 2×8 or larger lumber. Kiln-dried lumber is preferred for blocking because it’s more stable and less prone to shrinking or warping than standard pressure-treated wood, ensuring bolted connections remain tight.
-
Shims (plastic or composite): For fine-tuning post plumbness.
-
Exterior-Grade Construction Adhesive/Silicone Caulk: For caps and connectors.
-
Wood Screws: 3-inch or 3 1/2-inch pressure-treated compatible screws for blocking.
-
Deck Tension Ties (e.g., Simpson Strong-Tie DTT2Z): For reinforcing post-to-frame connections.
-
The Critical Connection: How to Bolt Metal Railing to Deck Framing
This is the heart of how to bolt metal railing to deck securely. The railing’s strength depends on anchoring the posts to the deck’s substructure, transferring force directly to the joists.
Prepping the Deck Frame for Maximum Strength
A railing’s structural integrity begins with a properly prepared deck frame.
-
Structural Blocking Importance: Since metal posts are bolted through the deck surface, solid blocking must be installed within the frame to create a strong foundation. Attaching posts only to decking or a rim joist is insufficient and a common cause of failure. Posts act as levers, so a robust connection is paramount.
-
Kiln-Dried Lumber Benefits for Blocking and Framing: We recommend kiln-dried 2x8s or 2x10s for blocking. Because it has less moisture, kiln-dried lumber is less likely to shrink or warp, ensuring bolts stay tight. For example, with Trex Signature posts, we install two 2” x 8” cross-bracing frames and two 2” x 8” blocking boards under the post location using pressure-treated compatible 3” wood screws. This creates a solid anchor that distributes the load.
-
Rim Joist Attachment & Reinforcing Joists: When attaching to a rim joist, ensure the load transfers to the main joists. A simply nailed rim joist is not strong enough; use special hardware that connects to the sides of joists. For other posts, blocking is essential. For the strongest attachment, we install posts inside the frame before adding decking.
The Best Fasteners for How to Bolt Metal Railing to Deck Posts
The right fasteners are critical for safety and durability. Avoid common mistakes by following these guidelines.
-
Through-Bolts vs. Lag Bolts: Always use through-bolts, never lag bolts, for railing posts. Lag bolts can crush wood fibers and lose grip. Through-bolts create a superior compression connection with nuts and washers that can be checked and tightened.
-
Hot-Dipped Galvanized Hardware: For most applications in Missouri and Oklahoma, 1/2-inch diameter hot-dipped galvanized hex-head bolts with broad-bearing washers are the standard for excellent corrosion resistance.
-
Stainless Steel Fasteners: For the absolute best in corrosion resistance, use stainless steel fasteners. Ensure they are compatible with any pressure-treated lumber to avoid galvanic corrosion.
-
Washers and Nuts: Use large washers on both ends of the through-bolt to distribute the load and prevent crushing the wood. Tighten nuts firmly but do not overtighten, as this reduces holding power. Check bolt tightness every six months, as wood can shrink.
-
Tension Ties: For added security, especially on taller decks, we recommend using deck tension ties like the Simpson Strong-Tie DTT2Z. These connect the post to the deck joist for extra structural integrity.
Installing and Plumbing Your Metal Posts
With the frame prepped and hardware ready, it’s time for the meticulous process of installing the posts.
-
Marking Post Locations: Measure your deck and plan your layout. Posts are generally spaced 6 to 8 feet apart. Mark the center locations on the decking for each post. For Trex Signature posts, aim for a 6’ or 8’ clear span.
-
Clamping and Leveling: Temporarily position the post against the blocking and rim joist, holding it firmly with clamps. Use a 4-foot level to ensure the post is perfectly plumb (vertical) in both directions.
-
Using Shims: If needed, use plastic or composite shims between the post and the framing to achieve perfect vertical alignment.
-
Checking for Plumb: Check for plumb on two adjacent sides to ensure it’s truly vertical. For accuracy, close one eye and sight the bubble directly.
-
Secure Attachment Methods:
-
Drilling Pilot Holes: Once plumb and clamped, mark and drill the bolt holes. For a 1/2-inch bolt, drill a 1/2-inch or 9/16-inch pilot hole (check manufacturer’s recommendation) through the post, blocking, and rim joist. For Trex Signature posts, use the post baseplate as a template and drill with a 5/8” bit.
-
Inserting Bolts: Insert the galvanized hex bolts with washers through the holes. For corner posts, we use three 1/2″x6″ galvanized carriage bolts.
-
Tightening: Hand-tighten the nuts, then use a wrench to snug them up without crushing the wood fibers. Re-check for plumb before fully tightening.
-
Tension Tie (Optional but Recommended): For extra reinforcement, install a DTT2Z Deck Tension Tie to the top bolt, securing it to the deck joist.
-
Assembling Your Metal Railing System
With the posts securely bolted and plumb, the rest of the assembly is much smoother. This is where your deck in places like Camdenton, MO, really starts to take shape!

A Step-by-Step Guide on How to Bolt Metal Railing to Deck Posts
This process involves attaching pre-fabricated panels or components to your posts.
-
Measuring Between Posts: Carefully measure the clear distance between the inside faces of the posts. This determines the cut length for your top and bottom rails. Account for any bracket offsets specified by the manufacturer. For Trex Signature, measure between brackets to ensure even baluster spacing.
-
Cutting Rails to Size: Using a miter saw with a metal-cutting blade, cut the top and bottom rails to the measured dimensions. Accuracy is key for a professional fit. Pre-drilling is required when attaching the railing to brackets.
-
Attaching Brackets: Following manufacturer instructions, attach rail brackets to the posts, usually with self-tapping screws. For Trex Signature, mark bracket locations for a 36″ or 42″ rail height. Clamp and attach the brackets, pre-drilling as needed.
-
Installing Bottom Rail: Position the bottom rail in its brackets. Level it, then fasten it with the provided screws. For Trex Signature, snap on the rail cover, set the rail in the brackets, and fasten with a 5/8” self-tapping screw on each side after pre-drilling.
-
Inserting Balusters: Baluster installation varies by system. Ensure they are spaced no more than 4 inches apart to meet code. For Trex Signature, attach the center baluster to the bottom rail first, then insert the rest.
-
Securing Top Rail: Position the top rail over the balusters, ensuring a snug fit. Fasten the top rail to its brackets with the specified screws. For Trex Signature, insert balusters into the top rail, fasten the center one, then secure the rail to its brackets before installing the top rail cover.
Tackling Stairs and Corners Like a Pro
Stairs and corners require careful planning but are manageable with the right components.
-
Stair-Specific Brackets: Stair railings require specialized, pivoting brackets to match the stair angle. Follow manufacturer instructions for cutting rails to the correct angle and length. To keep balusters plumb, the top rail’s first baluster spacing is 2-1/4″ longer than the bottom rail’s.
-
Finding Angles: Use an angle finder or digital protractor to accurately measure the stair angle for cutting.
-
Corner Post Techniques: Corner posts anchor two railing sections. We use three 1/2″x6″ galvanized carriage bolts to handle forces from both directions. Brackets attach to different faces of the post.
-
Continuous Top Rails: Some systems allow for a continuous top rail around corners using mitered cuts and specialized connectors.
-
Ground-Level Posts: Stair railing posts that lead to grade should be set in concrete for maximum stability.
-
Code Compliance for Stairs: Stair railings have specific codes. The gap between the bottom rail and stair treads is typically less than 6 inches. A 6-inch sphere must not pass through the triangle formed by the rail, tread, and riser. We always meet these critical safety measures.
Frequently Asked Questions About Metal Railings
Metal railings are a significant investment, so it’s natural to have questions. Here are some of the most common ones.
Do metal deck railings get hot in the sun?
Yes, metal railings can get hot to the touch in direct sunlight. However, materials compare differently:
-
Aluminum vs. Steel: Aluminum absorbs heat but also dissipates it faster than steel or wood, cooling down quickly once in the shade. Steel may retain heat longer.
-
Color Impact: Darker colors absorb more heat than lighter colors. A lighter-colored powder-coated aluminum railing is a good choice if heat is a concern.
-
Our Take: For most homeowners in Missouri and Oklahoma, the durability and low maintenance of metal railings outweigh the heat consideration.
How long do metal railings last and what maintenance is needed?
This is where metal railings truly shine.
-
Lifespan: Powder-coated aluminum metal deck railings are exceptionally durable, lasting 20 years or more. This lifespan is due to aluminum’s resistance to rust and corrosion, plus the powder coating’s protection. Unlike wood, it won’t rot, warp, or suffer insect damage.
-
Rust Prevention: Aluminum is a non-ferrous material and does not rust. Wrought iron will rust if its paint is compromised, requiring regular maintenance. Stainless steel is highly rust-resistant but can develop “tea stains” without cleaning.
-
Cleaning Tips: Metal railings require little maintenance. A simple wash with mild soap and water is usually sufficient. Avoid abrasive cleaners. Also, check bolt tightness every six months, as wood shrinkage can loosen fasteners.
What is the typical cost of metal deck railings?
The cost of metal railings varies by material, design complexity, and installation method (DIY vs. pro).
-
Cost per Linear Foot: Expect powder-coated aluminum to cost between $40 and $55 per linear foot, including posts, rails, and balusters. Stainless steel and custom wrought iron may be higher.
-
Factors Affecting Final Price:
-
Material: Aluminum is generally more affordable than stainless steel or custom wrought iron.
-
Design Complexity: Straight runs are less expensive than designs with many corners or stair sections.
-
DIY vs. Professional Installation: While DIY is an option, professional installation adds labor costs but ensures a correct, code-compliant job, which is invaluable for safety and longevity.
-
Additional Features: Integrated lighting or decorative posts will increase the overall cost.
-
At Top Deck, we provide top-quality products and expert guidance, whether you’re a DIYer or working with a contractor. We believe in providing value that lasts.
Finishing Touches for a Professional Look
The hard work of how to bolt metal railing to deck is done, but finishing touches lift your deck’s appearance and protect your investment.
-
Post Caps: These are not just decorative; they protect post tops from weather. Secure them with exterior-grade construction adhesive or the provided fasteners.
-
Post Skirts: These slide over the post base to cover mounting hardware for a clean look. Install them before other accessories.
-
Bracket Covers: Many systems include bracket covers that snap on to conceal fasteners for a polished look.
-
Final Fastener Check: Do a final walk-through, checking all bolted connections and screws to ensure they are snug and secure.
-
Integrated Lighting: For ambiance and safety, consider adding lighting to your railing. Post cap or rail lights can transform your deck at night. Plan and install lighting before adding final caps or rail covers.
At Top Deck, we’re passionate about helping homeowners and contractors in Southwest Missouri and Oklahoma create beautiful, safe, and long-lasting outdoor living spaces.
From expert guidance on Decking and Products to comprehensive Services for Outdoor Living, we’re here to support your project from frame to finish.
Ready to secure your deck with a stunning and safe metal railing? Explore our premium railing systems and complete your outdoor living space